Pages

Saturday, June 23, 2012

From tablecloths to curtains..


I have been looking for yellow curtains since probably back in the fall for my room...I wanted bright yellow so it would add some color against my gray walls and all I could find was a pastel yellow that looked like it belonged in a baby nursery so I got curious and started searching online and I finally found on pinterest how to make these...they don't involve sewing so I automatically fell in love because sadly I do not know how to sew (I will master that this year though.).
 So here it is... THE "no-sew tablecloth curtains"!!

This is the finished project...

What you will need for this project


I went to Target and found this bright yellow tablecloth...just the yellow I wanted and it was only $18.00!!
I bought the 60"x80"

I measured it to find out where the middle was and then I took a sharpie and put a little dot there so I could remember where to cut it (don't worry no one will see it after you are finished!)

I used regular sissors to cut the tablecloth..after you cut it into two turn them over for the next step!

This is what I used so that the ends that I did cut wouldn't look like fringe from blue jean pants you decide to make into shorts!

This part is very easy it just takes a little bit of time. All you do is turn over the half and on the side that you cut you lay the hem strip down ( leave a little bit of space so you can fold the fabric over the hem strip)

This is what it looks like after you iron the fabric over the hem strip (and you can see the black dot from where I marked it when I was measuring it out...no one can see it now!)

Just a closer look at the finished project! LOVE the color/design!
After you finish ironing up the sides iron the whole thing so it doesn't have a wrinkled look.

These are the clips I used (I forgot to take a picture of them in the package, sorry!) I bought mine from Target also and alot come in a pack they are $4.00.

They aren't tacky looking which I love. All you do is hook them on to the top of your curtains and then slide them through the curtain rod and then...you are DONE!

One last final look at it!! I know they are long but I have stuff in front of my windows....so I don't care but If you don't want your's that long just measure and cut whatever length you want and get that hem strip added to the bottom!

If I had gone out and purchased regular curtains from JC Pennys...they would have cost me around $60.00 per window (one set of curtains)
but making them this way
 I spent $66.00 TOTAL and that covers all three windows!


The curtains: $54.00
 (3 tablecloths at the price of $18.00 a piece. One tablecloth per window just cut in half)
The Hooks: $12.00
(One pack of hooks per window)

So there you go!
The cheaper way to have WHATEVER kind of curtains you want!


Friday, June 15, 2012

Father's Day Crafts

Below are a few different ideas for Father's Day coming up! There are a ton of different ideas out there, but here are just a couple that I found that I liked the most. 

I work in a daycare...I have ages 8 weeks to 12 months old.
The most I can do is footprints and handprints and as you probably know babies like to keep their hands in a fist so I mostly stick to foorprints when dealing with paint. I do try to trace their hands occasionally but I have learned a trick....I have traced all the babies hands and I saved that and just use it for every project so I don't have to keep tracing and keep tracing. With 8 babies all on their own schedules this just saves time.


Father's Day project #1

I did pink for the girls and green for the boys.

The cute poem I found online!


Father's Day project #2

The front
Just use washable paint and make a footprint and then use
the tips of their fingers to make the polka dots.


The back


The saying on the back

Daddy,
I made this tie just for you to wear on your special day with love...
from my tiny fingers to the tips of my toes.
Now put it on and let's get a picture together,
so we can look back later in years and remember our first Father's Day together!


I traced the original copy of the tie on a piece of poster board
so it would be thick enough to hold paint and not tear.


Father's Day project #3

The cute saying I put at the bottom.

The finished project!


Most of the Daddy's in my classroom are first time daddy's
it's the sweetest thing ever seeing them get excited when just talking about it.
Happy Early Father's Day to my sweet and hard working daddy and all the other Daddy's out there.
Enjoy your special day!


Monday, June 11, 2012

Office Chair...MAKEOVER


So this is the before and after of my office chair...makeover!


I printed this cupon off Joann's website and saved $7.00. I was a happy girl.


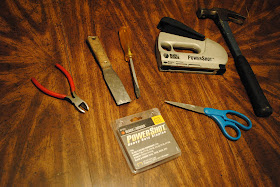
These are the tools I used....my chair was really old and I needed more tools you can probably get away with just using the screwdriver and staple gun.

First I tok off the back cushion and then I took off the seat cushion.

The fabric I picked out...I am in love with it! I bought 2 yards just in case I messed up and needed more but I ended up have alot left over so I will save it for another project.

I laid the back of the cushion down on the fabric to see how much I needed (I didn't want to cut off too much or not enough)

I have an old chair so it had these awful hooks that the back was connected to. So I have to lift each one of these up with a screwdriver and then I pulled the fabric over them and used a hammer to lay them back down...very time consuming but worth it.


The back...FINISHED! Now on to the seat cushion (it was easier to do)


This is where I used the staple gun. This part was the easiest!

I wanted to paint the black part gray to match my walls in my bedroom. I probably should have used a white primer first but I was too excited to see the gray on it...It took three coats because I didn't use the primer. Patience patience patience.


After the THIRD and final coat of paint...


 I waited for the paint to dry and then I added the cushions back on (a little tricker screwing them on then when taking them off)


Needless to say I LOVE my new chair and it goes pefrect with my room.
This project only cost me $7.00
The fabric: $7.00
The paint: $0.00 (left over from my room)
The tools: $0.00 (daddy's tools)


Sunday, June 10, 2012

I have never had a blog so I am just going to see how this goes!
First off I'll tell you a little bit about myself and then I'll tell you why I am blogging. I am a 19 year old college student, I still live at home with my family. I attend Motlow State Community College for now I will transfer to a University later. I live in Tennessee and I have lived in the same house since I was born. I love to paint, cook, photography, crafts, and decorating/planning things.

I have three little sisters; Mady who is 15 (she is fixing to get her permit, so pray for the saftey of all drivers.) Samantha aka Sammy Jo who is 8 (she is my mini me and she loves to follow me around and "hangout" as she calls it. I love it.) and last but not least Macy who is 7 (she is the baby and she is crazy just kidding but she always keeps us laughing). I love being the older sister (sometimes) and I am thankful they are in my life. My parents have been together for 25 years and are still crazy in love like teenagers. It's cute and I hope to still be in love like that when I am their age. My mom is a preschool teacher and daddy builds cars.

Matthew and I met about 15 years ago...we were on the same little league baseball team. Even though I don't remember him from then I still like to tell people that and I have a picture. We actually have been around each other our whole lives we just never crossed paths until about 2 and a half years ago. I went to church with my friend one Wednesday night and he was in the youth group, I started going there more and we got to know each other very well thanks to the help of my best friend, Kathleen. We started "talking" and we eventually started dating. I was his first girlfriend so he was very nervous and I loved every minute of it! He is the kindest, most caring and compassionate man I have ever met. He loves me despite all of my imperfections. I wouldn't trade him for the world. He asked me to be his girlfriend on May 29, 2010 and here we are a little over two years later! Still head over heels for each other. I am blessed beyond measures to be in this wonderful relationship with such a christian man. We love to go to new places and cook together!


.....
I am currently giving my room a makeover and I have been since last July....almost a year, I know. My room was originally bright yellow and I just felt it was time to redo it. So I spent days and I mean days trying to decide on a new color and with the help of pinterest I decided on grey! I know that might sound ugly but my plan is to have yellow accents all throughout my room to add some color. I have been painting like crazy making stuff for my room and I even redid a lamp I bought from Target. I just finished doing my office chair in there and I want to start on my curtains next! So I will be posting pictures and posts on each little thing I work on and I'll give step by step instructions with pictures (I am a visual learner). Also by the end of December I want to have a cookbook made and stocked with at least 100 recpies in it I have made ALL by myself (I am trying to learn how to cook comething other than mac & cheese...Matthew is loving it!). So I will be posting about my different dishes I make also! So I hope you enjoy what all I post!