Monday, July 30, 2012

I love this man

This is going to be one of those cheesy "I love my boyfriend" posts and I'm not sorry!!

Every since March 11, 2010 I have been crazy and I mean crazy about Matthew. I still remember sitting in spanish class and texting him for the very first time and wishing him a happy birthday (little did I know I would be wishing him happy birthdays in person from there on out). I remember that night going to his house for the first time and meeting up with everyone before going to dinner for his and his twin brothers (Nathan) birthday. There was a big group of us and and we all went outside to leave for dinner and I decided to ride in Matthew's car with him and a few of our friends. I sat in the back on the way there and on the way back to his house after dinner I rode up front and I must say that was one of my smarter decisions. ;) Keep in mind before that day I had hardly said a full sentence to Matthew but when I was riding up front and talking to him and laughing and singing along to the radio I knew it was something I wanted to do again and with him. I remember leaving his house that night and a girl that was there calling me and asking what was going on between me and Matthew and all I could do was blush and laugh. I remember smiling all the way home that night and not wanting it to end.

Fast forward 2 years, 4 months and 1 day and here we are today!

I sometime still can't believe he chose me. Everyday I wake up and I am amazed by how much he loves me. He is an amazing boyfriend and an even better christian and I love his heart and trust him with my life. Over the past 2 years I have watched him grow and mature into the man he is today and I couldn't be more proud of him. He has taught me to love and to be who I am today. I am blessed beyond belief and I won't ever take that for granted. Ever.

With my whole heart for my whole life, I love you Matthew.

Wednesday, July 11, 2012

My new job....has started!!

This past Tuesday I started my new job at Bank Of America and lets just say it is the COMPLETE opposite from the daycare I used to work at. I'll give you some examples...at the daycare I wore scrubs, I played with the babies all day, I changed diapers and washed my hands at least 4 times an hour, I was on a strict feeding schedule with each baby, I saw pretty much the same people and children every single day, I did art work (handprints, footprints, coloring, cutting out art work and taping it to the walls, bulletin boards). At the bank I wear dress clothes (business professional), heels, I sit at a desk all day and read from a computer screen and then take small assessments after each section, I have saw more money than I'll ever have, I have saw alot more people each day than I normally do, I have a ton and I mean a ton of paperwork, I know I am just in training and this is only my second day but I am ready to be finished with training and working in a window as a teller! At the daycare did all that for the past year so it was routine for me and to be honest I haven't fed a baby in over 5 days and it is just WEIRD.
Don't get me wrong I am in LOVE with my new job there is just a huge differance and it is going to take some time to adjust but I know I am very lucky and blessed to have this amazing oppertunity and I am not going to let it slip away!

2 weeks ago I was walking up and down the beach looking for seashells and watching the waves roll in under the moonlight. Missing the beach tonight and the sand between my toes.


1 week ago I was watching the fireworks my town sets off with my sweetie. I was our 3rd fourth of July together and I caouldn't have asked for a better one! Cookout with my family, church, holdin hands under the fireworks, and sweet kisses. Missing my sweet man more than anything though.


The past three years...yeah we have changed some. I love looking through old pictures and seeing the differance! Love you Matthew!

Saturday, July 7, 2012

Happy (late) 4th of July!

The past month has been absolutely crazy for me, in most ways good.
I have accepted a new job, quit my old job, came down with the stomach virus, went on vacation, holidays, etc.


So this post is a few days overdue...sorry!

Matthew's parents had a cookout the night before July 4th so I woke up on the 3rd and raced to the store to make something festive....and this is what I came up with! I got it off of pinterest, of course but like always I added a few things to make it my way.

.It is very simple and very quick to make last minute like I did before I had to go to work.
Here is all you will need!


These aren't really the sprinkles I wanted to use but I was on a time crunch and this was all good ol wal mart had..so it had to do.


After you mis up the cake mix like it says on the box just divide it into thirds..so that you end up with three different bowls of cake mix.
Leave on plain and then take the red and blur food coloring and in the second bowl add blue or red coloring ( I didn't measure..Just go by your judgment) and in the third bowl add the last color. Make sure you mix the food coloring in very well.

RED, WHITE, & BLUE is what I had to keep telling myself so I wouldn't get the layers mixed up. Use a tablespoon to add in each layer and carefully spread it out...but not too much or it will mix together.

Next is white...then red on top.
Then just pop them in the oven for 12-14 minutes!


And this is the outcome!! I was so excited to see they turned out well.
Wait about 25-30 mins to let them cool before you put the icing on.

I cheated and used the icing out of a can...just so it would look better.
After you icing them just add sprinkles, if you want.

I had to cut one in half just so I could see it and I was SO pleased with the outcome!

So there ya have it..a few ingredients and about an hour!
They were a hit and I was pleased!


Saturday, June 23, 2012

From tablecloths to curtains..


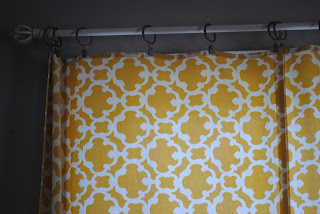
I have been looking for yellow curtains since probably back in the fall for my room...I wanted bright yellow so it would add some color against my gray walls and all I could find was a pastel yellow that looked like it belonged in a baby nursery so I got curious and started searching online and I finally found on pinterest how to make these...they don't involve sewing so I automatically fell in love because sadly I do not know how to sew (I will master that this year though.).
 So here it is... THE "no-sew tablecloth curtains"!!

This is the finished project...

What you will need for this project


I went to Target and found this bright yellow tablecloth...just the yellow I wanted and it was only $18.00!!
I bought the 60"x80"

I measured it to find out where the middle was and then I took a sharpie and put a little dot there so I could remember where to cut it (don't worry no one will see it after you are finished!)

I used regular sissors to cut the tablecloth..after you cut it into two turn them over for the next step!

This is what I used so that the ends that I did cut wouldn't look like fringe from blue jean pants you decide to make into shorts!

This part is very easy it just takes a little bit of time. All you do is turn over the half and on the side that you cut you lay the hem strip down ( leave a little bit of space so you can fold the fabric over the hem strip)

This is what it looks like after you iron the fabric over the hem strip (and you can see the black dot from where I marked it when I was measuring it out...no one can see it now!)

Just a closer look at the finished project! LOVE the color/design!
After you finish ironing up the sides iron the whole thing so it doesn't have a wrinkled look.

These are the clips I used (I forgot to take a picture of them in the package, sorry!) I bought mine from Target also and alot come in a pack they are $4.00.

They aren't tacky looking which I love. All you do is hook them on to the top of your curtains and then slide them through the curtain rod and then...you are DONE!

One last final look at it!! I know they are long but I have stuff in front of my windows....so I don't care but If you don't want your's that long just measure and cut whatever length you want and get that hem strip added to the bottom!

If I had gone out and purchased regular curtains from JC Pennys...they would have cost me around $60.00 per window (one set of curtains)
but making them this way
 I spent $66.00 TOTAL and that covers all three windows!


The curtains: $54.00
 (3 tablecloths at the price of $18.00 a piece. One tablecloth per window just cut in half)
The Hooks: $12.00
(One pack of hooks per window)

So there you go!
The cheaper way to have WHATEVER kind of curtains you want!


Friday, June 15, 2012

Father's Day Crafts

Below are a few different ideas for Father's Day coming up! There are a ton of different ideas out there, but here are just a couple that I found that I liked the most. 

I work in a daycare...I have ages 8 weeks to 12 months old.
The most I can do is footprints and handprints and as you probably know babies like to keep their hands in a fist so I mostly stick to foorprints when dealing with paint. I do try to trace their hands occasionally but I have learned a trick....I have traced all the babies hands and I saved that and just use it for every project so I don't have to keep tracing and keep tracing. With 8 babies all on their own schedules this just saves time.


Father's Day project #1

I did pink for the girls and green for the boys.

The cute poem I found online!


Father's Day project #2

The front
Just use washable paint and make a footprint and then use
the tips of their fingers to make the polka dots.


The back


The saying on the back

Daddy,
I made this tie just for you to wear on your special day with love...
from my tiny fingers to the tips of my toes.
Now put it on and let's get a picture together,
so we can look back later in years and remember our first Father's Day together!


I traced the original copy of the tie on a piece of poster board
so it would be thick enough to hold paint and not tear.


Father's Day project #3

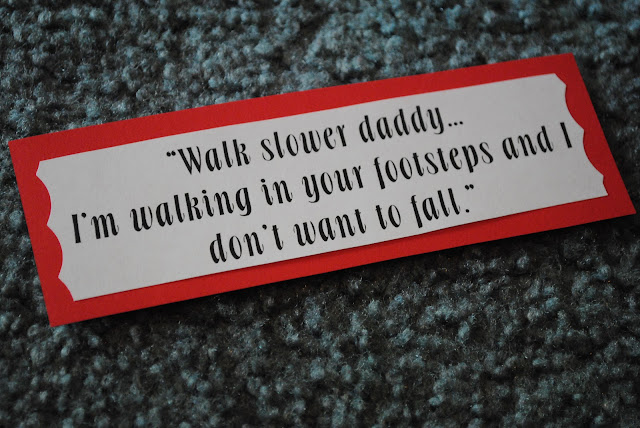
The cute saying I put at the bottom.

The finished project!


Most of the Daddy's in my classroom are first time daddy's
it's the sweetest thing ever seeing them get excited when just talking about it.
Happy Early Father's Day to my sweet and hard working daddy and all the other Daddy's out there.
Enjoy your special day!


Monday, June 11, 2012

Office Chair...MAKEOVER


So this is the before and after of my office chair...makeover!


I printed this cupon off Joann's website and saved $7.00. I was a happy girl.


These are the tools I used....my chair was really old and I needed more tools you can probably get away with just using the screwdriver and staple gun.

First I tok off the back cushion and then I took off the seat cushion.

The fabric I picked out...I am in love with it! I bought 2 yards just in case I messed up and needed more but I ended up have alot left over so I will save it for another project.

I laid the back of the cushion down on the fabric to see how much I needed (I didn't want to cut off too much or not enough)

I have an old chair so it had these awful hooks that the back was connected to. So I have to lift each one of these up with a screwdriver and then I pulled the fabric over them and used a hammer to lay them back down...very time consuming but worth it.


The back...FINISHED! Now on to the seat cushion (it was easier to do)


This is where I used the staple gun. This part was the easiest!

I wanted to paint the black part gray to match my walls in my bedroom. I probably should have used a white primer first but I was too excited to see the gray on it...It took three coats because I didn't use the primer. Patience patience patience.


After the THIRD and final coat of paint...


 I waited for the paint to dry and then I added the cushions back on (a little tricker screwing them on then when taking them off)


Needless to say I LOVE my new chair and it goes pefrect with my room.
This project only cost me $7.00
The fabric: $7.00
The paint: $0.00 (left over from my room)
The tools: $0.00 (daddy's tools)